Page speed is critical for user experience, bounce rates and SEO ranking. Using a Content Delivery Network we get faster page load globally and a reduced load on the server.
Here's my solution for a self-hosted Ghost to serve images, javascript and stylesheets over BunnyCDN, when you have access to nginx configuration. If you are not self-hosted there is another way where you point your domain to Bunny's CDN and use edge-rules to exclude URL's used for the Ghost admin interface.
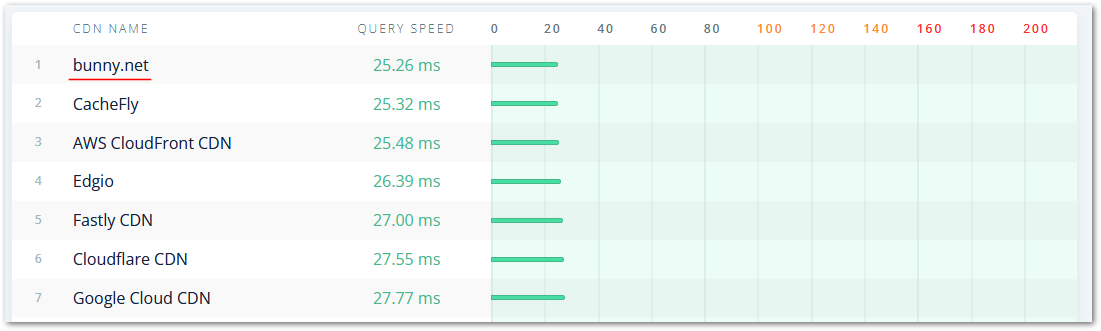
I've been working with streaming media professionally for 20+ years and CDN's used to be no end of pain. BunnyCDN has managed to take something extremely complex and make it both user-friendly and lightning fast. Bunny is ranked the #1 Fastest CDN in 2023 according to cdnperf.com
This page loaded all images, scripts, stylesheets and fonts in [wait...] seconds. Google considers a page to be fast when this number, TTI Time-To-Interactive, is less than 3.8 seconds.
However, BunnyCDN is not a 'simple' or 'light' CDN - it has all advanced features such as edge rules, cache-control, network limits, smart caching, CORS headers, custom error pages.
Bunny offers DNS services, video streaming with DRM, file delivery with access tokens, and logs. Highly recommended and a steal at $0.01/GB transfer with a minimum $1 charge each month. They also provide free privacy-friendly web fonts - an alternative to Google Fonts.
When we're done there will be three URL’s to keep track of..
- www.mysite.com → regular URL for CDN-accelerated Ghost blog
- nocdn.mysite.com → the Origin for the CDN without acceleration and cache.
- cdn.mysite.com → URL for CDN-cached media, a CNAME (alias) of the CDN delivery URL mysite.b-cdn.net
I only recommend services I use myself and all opinions expressed are my own. This post contains affiliate links that credit my Bunny CDN account if you decide to sign up. Thank you!
Step 1: Create a CDN origin URL
The origin URL is your Ghost blog without acceleration. The CDN will pull assets to be served from this URL - images, JavaScript and stylesheets.
BunnyCDN can not fetch images from your live blog URL - the image links are pointing back to the CDN and Bunny will be unable to pull and cache assets. Angry Bunny in a loop, not good. So, we need an origin.
- Create a subdomain
nocdn.mysite.comor something less obvious such asg534k9.mysite.comin your DNS administration panel. - Enable this site in nginx - copy the existing configuration, remove certbot's SSL config, and change the server name to
nocdn.mysite.com - Reload nginx and have Certbot generate a SSL certificate for
nocdn.mysite.comLetsencrypt/Certbot can generate a wildcard certificate for all subdomains using TXT-record verification, you need a plug-in for your DNS provider. - Verify that you can access your Ghost blog at
https://nocdn.mysite.com
Step 2: Create a pull zone
- Register a new account with BunnyCDN at bunny.net
- Under CDN choose Add Pull Zone
- Choose any meaningful Zone Name:
mysite.b-cdn.net - For Origin enter the Ghost blog origin URL created in step 1, ex.
nocdn.mysite.com

- Choose Standard Tier and disable Zones you have no visitors from.
- Done. Bunny now pulls all html, images, scripts and css from your Ghost blog.
- Create a CNAME sub-domain in your DNS admin panel, such as
cdn.mysite.comand point this to Bunny's Zone namemysite.b-cdn.net - Wait for DNS-propagation of this CNAME and have Bunny create a SSL cert for
cdn.mysite.comin the admin panel. - Verify that images from your Ghost blog are available on Bunny CDN
https://www.mysite.com/content/images/carrot.jpg- Local server deliveryhttps://cdn.mysite.com/content/images/carrot.jpg- CDN global delivery
Step 3: Configure nginx
- Modify the ‘live’ configuration file for
https://www.mysite.comnot the originnocdn.mysite.com - We use nginx
sub_filterto re-direct image requests to our CDN. It’s basically search-and-replacesub_filter 'replace this' 'with this'; - gzip compression must be disabled between nginx and Ghost when using
sub_filter- gzip is still enabled for nginx external requests.
Add this in the nginx proxy_pass block - change www.mysite.com to your domain and cdn.mysite.com to the CNAME subdomain.
Restart nginx and you're done. nginx will rewrite URL's to fetch globally cached assets on BunnyCDN.
https://www.mysite.se/content/images/size/w1000/2022/11/carrot.png
becomes...
https://cdn.mysite.se/content/images/size/w1000/2022/11/carrot.png
Step 4: Verify everything is OK
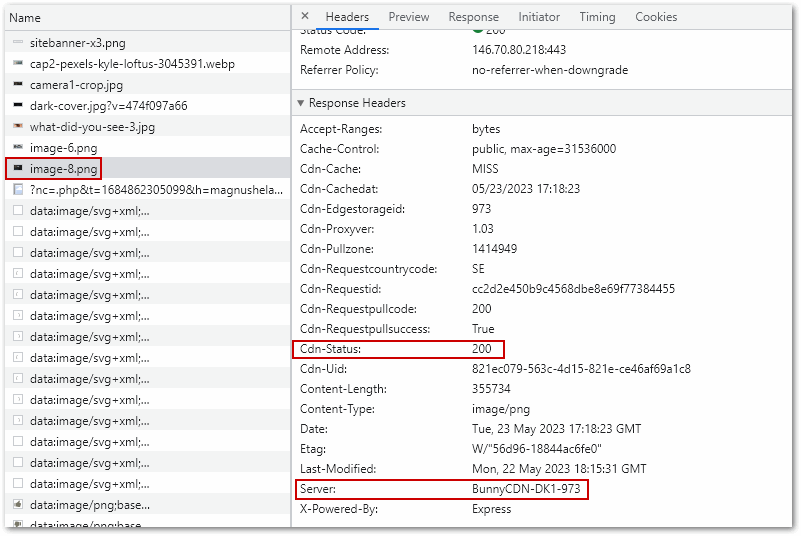
Open up Developer Console / Network. View www.mysite.com with a shift-reload in browser to reload all elements on the page. Inspect any image file, you should see Server: BunnyCDN
A note on caching in Ghost CMS
In the support section Bunny writes
BunnyCDN does not monitor the files on your origin server for changes, this means that if a file is already cached on our servers, it will remain cached until the Cache-Control expires or it gets deleted to make space for more popular content.
All assets from Ghost using the {{asset}} tag are served with a ?v=####### query string which changes when Ghost is restarted, aka cache-busting. To have Bunny pull latest versions of javascript libraries and stylesheets after making changes, restart Ghost.
.js and .css files will get a new ?v=####### string and Bunny will pull the updated file from your origin. You can also purge individual files in the admin interface, and there's always the nuclear option to hit Purge Cache and pull fresh copies all your assets.
And, insert a pre-connect to your CDN in <HEAD>, this reduces the number of network round-trips needed when the browser loads a resource from the CDN.
<link rel="preconnect" href="https://cdn.mysite.com">
Restrict access to your Origin URL
The origin URL nocdn.mysite.com should only be available to BunnyCDN. Subdomains can be sniffed easily and we don't want anyone to index or access our site on the non-accelerated origin URL.
To solve this we ask BunnyCDN to send a request header X-Pull with a random key, and have nginx check for this key in the X-Pull header.
1. BunnyCDN control panel
Create a new Edge rule with
- Action: Set Request Header
- Header: Name:
X-Pull - Header Value:
random12345- use any passphrase here - Conditions: Request URL matching Any for
https://cdn.mysite.com/*
2. nginx config for nocdn.mysite.com
Add this to the proxy_pass block in nginx for the origin config. If the header X-Pull in the request does not contain the key we assigned in the Edge rule we return 403 Forbidden status code.
     if ($http_x_pull != "random12345") {
         return 403;
        }
This solution was suggested by KeyCDN and they have a HTTP Header Checker to verify. Stuck and need some help? I'm on Telegram at @kmhelander
Bunny's video streaming transcribes and captions any video you upload. The Bunny Optimizer enables WebP image compression, watermarks, and minify of javascript & CSS. Bunny also host free privacy-friendly web fonts as an alternative to Google fonts at fonts.bunny.net.